Chopsmith 1.0.1 · guide
How to use Chopsmith
Five minutes to your first loop, then everything else, including the Editor window, where most of Chopsmith lives.
Quick start
- Put a song on an audio track and Chopsmith after it. Drag
Chopsmith.amxdonto the track's device chain (or from the browser if you copied it into your User Library). No song in the set yet? Press Drop and drop an audio file on it: Chopsmith puts it on a "Chopsmith Crate" track for you. - Let it read the song. It works out the tempo, the downbeat, the key and the song's sections in the background; the status line under the waveform tells you when it's done. Full songs are fine, and FLAC, MP3 and M4A all work.
- Check the 1. The grid starts at 1.1.1 (the orange flag). If it isn't on a downbeat, turn on Set 1.1.1 and click the real downbeat (it snaps to the nearest hit), or nudge it a beat with ◀ ▶.
- Pick a length and click. Choose 1/16 to 8 bars above the waveform, then click the waveform: the loop is the cell under your click. Or press Best ▸ to jump to loops that repeat cleanly.
- Hear it. Audition plays the loop in time with your set. Keep clicking or pressing ▶ while it plays; each change takes over on the next bar line.
- Paste it. Choose Session or Arrange and press Paste: you get a warped, looping clip of just that loop. Undo paste takes it back. Want notes instead? Switch Output to MIDI and press the same button.
- Open the Editor. Press Editor. Star the loops you like (★), look at the song's Sections, and try Sketch ↓ for an instant draft arrangement.
Hover over any control to see what it does in Live's Info View (the panel at the bottom left; Shift+? shows it).
The device
 1
2
3
4
5
6
7
8
9
1
2
3
4
5
6
7
8
9
- Source: the track (This track by default) and the clip (the one you click in Live, or pick one). Drop loads a file onto the Chopsmith Crate track.
- Stem and Clean: work on just the drums, bass, vocals or others (Stems).
- Tempo grid: the tempo (type one, or ÷2 ×2), time signature, Set 1.1.1 and ◀ ▶, Detect, Steady / Follow and Match key. The key shows underneath.
- Loop length, from 1/16 note to 8 bars, and zoom (− + Fit), Loop.
- Editor: the big window with everything else (The Editor).
- The waveform. The top strip is the whole song with its sections (A, B, C…); click or drag it to move, scroll to zoom. Below is the grid: click a cell to make it the loop.
- ◀ ▶ step loops, Audition, ★ favourite, Best ▸, and Pitch (semitones and cents).
- Output: Audio or MIDI, Session or Arrange, and where it goes.
- Paste, Undo paste, and the paste options: All sizes, Paste ★, Export, Export ★, Rev, speed, Lvl, Warp.
The Editor
Press Editor on the device. You get a window with the waveform across the screen and a panel with six tabs. Leave it open while you work: it follows the device, and the device follows it.
Keys while the Editor is in front: Space plays, ← → previous / next loop, ↑ ↓ move through the list, F favourite, B best, G save groove, 1–8 loop length, Enter pastes. On the Crate and Mashup tabs, typing searches. If the keys don't respond, click the window once. ? at the end of the tabs opens this guide.
Favorites
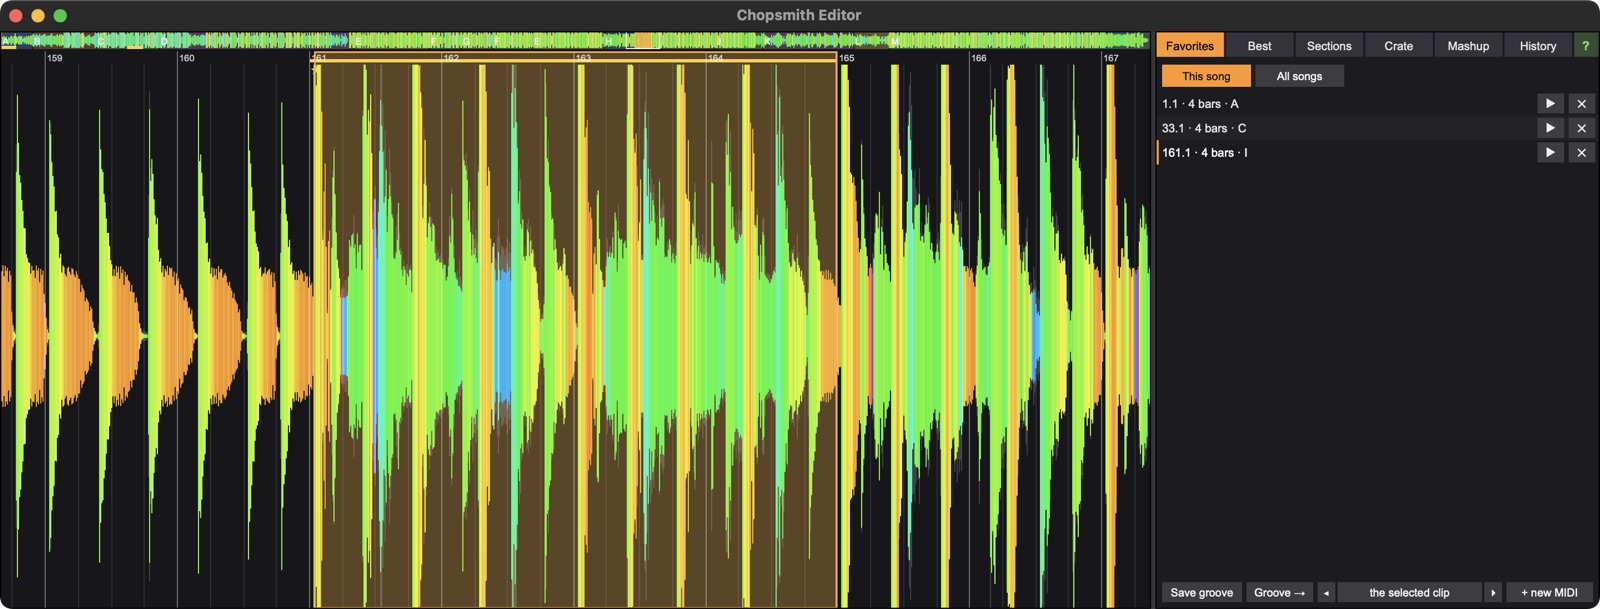
Every loop you star (★ under the waveform, or F). Click one to make it the loop, ▶ to hear it, ✕ to remove it. Paste ★ and Export ★ on the device use them all: a scene of loop pads in Session, or a sample pack. All songs is a library of every song's favourites: ▶ hears one, + pastes it, ↗ opens that song on it.
Along the bottom, the loop's groove: Save groove writes its timing and accents as a Live groove (User Library › Grooves); Groove → moves a MIDI clip's notes onto the loop's feel (◂ ▸ choose which clip); + new MIDI gives everything To MIDI writes that feel.
Best
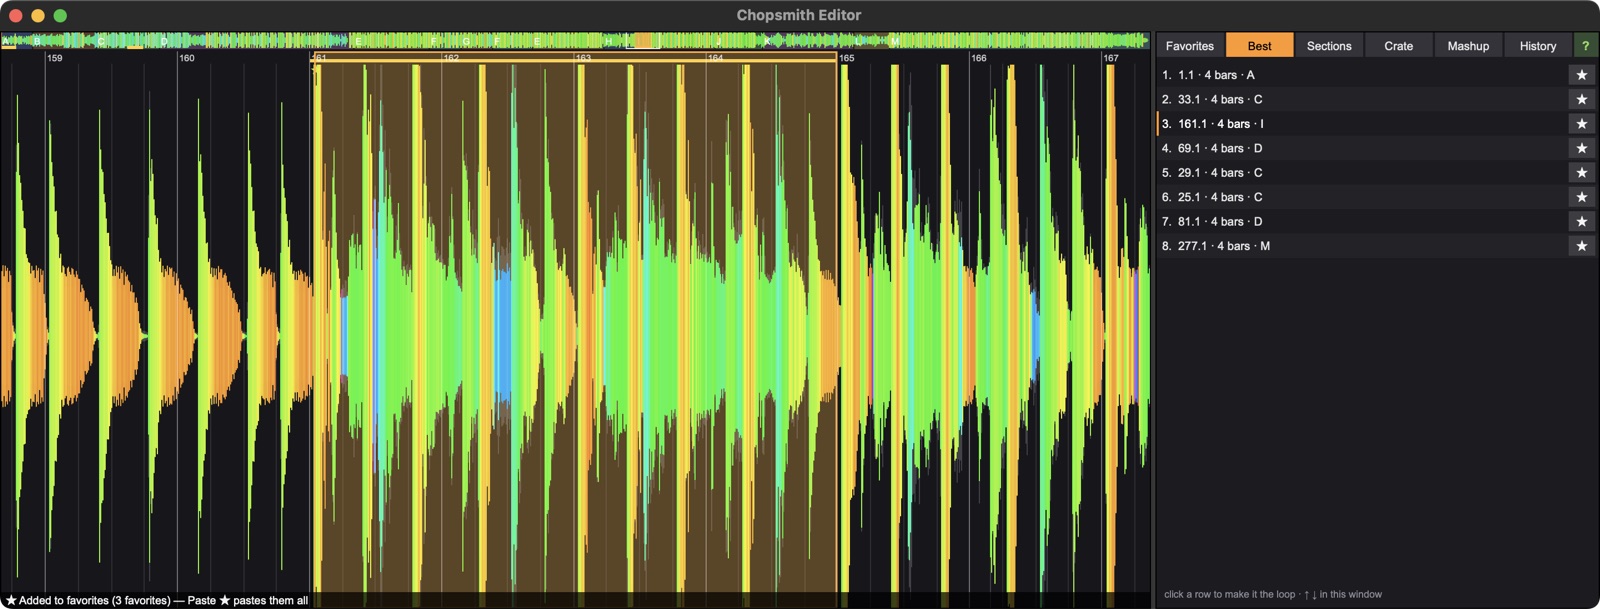
The loops that repeat most cleanly at this length, ranked, each with the section it's in. Click one to hear and use it; ★ keeps it. With a stem picked, it ranks that stem's loops (a bass line's phrase, not the full mix's).
Sections
The song's form: its key and tempo (with the runner-up reading a click away: use A minor, use 84.0), and each section with its time and length. The same letter means the same music. Click a section to loop it.
- Arrange: + lines sections up; To Session (a scene each) or To Arrangement (in a row from the playhead) rebuilds the song your way.
- Sketch ↓ lays out a ~64-bar draft in the Arrangement: intro, verse, chorus, verse, chorus. The Plan row shows the parts (click one, then move it, change its length, swap the section, add a break), and the Sketch row turns transitions on: Filter in, Risers, Build-ups, Soft joins, and how it ends (fade, echo, tape stop).
- Loop ▶ plays the current loop with one effect (Filter in, Build-up, Echo out, Tape stop, Fade out) in time; Paste pastes the one you heard.
Crate
Choose folder… reads a folder of songs in the background: tempo, key (with its Camelot code), chords and best loops. It sorts them by how well they fit your set: neighbouring keys and a tempo within a few percent. ▶ plays a song's main loop at your set's tempo; click one to load it. Type to search; Music hides talks and audiobooks; Sort cycles fit, next, BPM, key and name.
- Export ↓: every song's two main loops as WAVs in your User Library: a sample pack.
- DJ set: + adds songs, Order puts them in mixing order, and Build ↓ lays them out in the Arrangement on two tracks, each one coming in over the last.
Mashup
Loops whose chords sound good with this one, from this song and from your Crate, transposed to fit and ranked by what they'd add ("adds harmony", "bass on bass"…). ▶ plays a match with your loop, in time; + pastes both together; ↗ opens that song. If a Crate song's stems are in your set you can use just its drums, bass, vocals or others, and ⊕ stacks up to two matches on top of your loop. Chords → MIDI writes this loop's chords as a MIDI clip to play your own parts over.
History
Every paste, newest first, named by what it did. ↶ to here undoes back to a step; Undo all clears the session's pastes. (⌘Z in Live works too: each paste is one undo step.)
Picking loops
- Click the waveform for the cell under the pointer; drag across cells for a longer loop; ◀ ▶ step to the next one.
- Best ▸ jumps through suggested loops, marked in teal on the waveform.
- A loop whose end cuts a held note gets a red mark and a ✂ fix badge: click it and the loop grows to where the note ends.
- ★ marks favourites (gold on the waveform).
- The waveform's colours show frequency: red and orange for lows (kicks, bass), green for mids, blue for highs.
- The grid is the warp. Steady keeps one tempo; Follow makes the grid follow the song's beats, for recordings without a click (the status line suggests it when a steady grid drifts).
- Key: shown under the grid. Match key sets Pitch so the song lands on your set's Scale.
Chopsmith remembers each song's grid, loop and favourites, so it comes back where you left it, in any set.
Paste & export
- Paste makes a warped, looping clip of just the loop: into the next free Session slot, or the Arrangement at the playhead (press again to chain). It's seamless: no click where it loops round.
- Target: the source (or stem) track, a "Chopsmith" track, or any audio track.
- All sizes pastes every length from 1/16 to 8 bars; Paste ★ pastes all your favourites, a scene each: instant loop pads for Push or a Launchpad.
- Export writes the loop as you hear it (your tempo and Pitch) to a WAV beside your project's samples, named with its key and tempo. Export ★ writes every favourite; with All stems, every stem of every favourite: a loop pack.
- Rev reverses, ½× / 2× pastes at half or double speed, Lvl evens out the loudness, and Warp picks the warp mode (Auto chooses Beats for drums, Complex Pro for the rest).
- Undo paste removes what the last paste added. The Editor's History tab undoes several.
Stems
Run Live's Create › Separate Stems to New Audio Tracks on the song once. Chopsmith finds the stem tracks and fills the Stem menu: pick Drums, Bass, Vocals or Others, and the waveform, Audition, Best, Paste and To MIDI all use that stem, on the same grid. All stems pastes every stem at once, lined up. Clean takes the bleed out of a stem (kick clicks out of the bass, rumble out of the vocals).
To MIDI
Switch Output to MIDI and press the button. Auto follows the Stem menu: drums become kick, snare and hats; bass becomes a bass line; vocals the melody; others the chords. Or choose Drums, Bass, Melody, Chords, Slices (every hit on its own pad of a new Drum Rack) or Chops (vocal chops, one per sung note). The notes are drawn over the waveform before you commit.
- Sens finds more or fewer notes; the grid quantizes to 1/16, 1/32, 1/8 or not at all.
- Kit gives a new drum track a Drum Rack of the song's own kick, snare and hats.
- Var adds up to 8 variations in the next scenes: fills, ghost notes, octave jumps, inversions.
- Pitched parts follow Pitch, and snap to Live's Scale when Scale Mode is on.
Chopsmith Remote
Play Chopsmith from a pad controller. Put Chopsmith Remote (a MIDI effect) on a MIDI track whose input is your controller, armed or set to Monitor In. Its 16 pads, C1 to D#2 from the bottom left, are Paste, → Session, → Arrange, Undo paste, ◀ Prev, Next ▶, Shorter, Longer, Audition, ★, Best ▸, Paste ★, All sizes, 1.1.1 ◀ / ▶ and Detect. Learn maps your own notes or CCs; two knob slots step through loops and set the length. It drives the Chopsmith you used last.
Your licence
- Activate: the first time Chopsmith loads, the licence window opens. Paste the key
from your purchase email (it starts
CHOPSMITH-) and press Activate. It works offline after that. - Demo: without a key everything reads, plays and auditions; Paste, Export and To MIDI ask for the key.
- Three Macs. To move to a new one, deactivate the old Mac in the customer portal (the link is in your purchase email), then activate the new one.
- Licence agreement · Privacy · 14-day refund: email nlampert@syncpodcast.com.
Troubleshooting
- The tempo is double or half what I hear.
- Press ÷2 or ×2, or use the other reading on the Editor's Sections tab. Chopsmith remembers the choice for that album and artist.
- The loop starts in the wrong place.
- The 1 is off: turn on Set 1.1.1 and click the downbeat, or nudge it with ◀ ▶.
- Loops drift against my set.
- The recording probably wasn't played to a click. Switch the grid from Steady to Follow.
- The Stem menu is empty.
- Run Live's Create › Separate Stems to New Audio Tracks on the song first (or right-click the clip).
- The Editor's keys don't work.
- Click the Editor window once; Live sometimes keeps the keyboard.
- "A newer Chopsmith is installed".
- Your set holds the version it was saved with. Delete Chopsmith from the track and drag it in again: loops, favourites and keys are kept per song.
- Can I MIDI-map it?
- The options (Rev, speed, Pitch, Lvl, Warp, Output, Sens…) can be MIDI-mapped. The action buttons can't, so Live's undo doesn't press them again; use Chopsmith Remote for those.
- Something else?
- Email nlampert@syncpodcast.com with what you did and what the status line said.